TL;DR
Moving your rig into a closet drastically reduces noise and reflections, especially when combined with proper ventilation and sealing. Use targeted acoustic treatment for clarity, but remember, true soundproofing remains a challenge. The best setup balances noise control with heat management.
Imagine turning a tiny, echoey closet into your personal recording sanctuary. It sounds like magic, but it’s really just smart placement and treatment. Most folks reach for foam panels first, but the real game-changer is moving the noise source out of your space entirely.
If you want your workspace to stay silent and your recordings to sound crisp, you need to think beyond just absorbing sound. It’s about where you put your equipment, how you treat the space, and making sure your rig stays cool. This guide breaks down the most effective strategies to get that perfect balance of quiet and performance.
Acoustic dampening
& the rig in the closet.
The most powerful noise fix isn’t a material — it’s a floor plan. A rig you can’t hear because it’s in another room beats any amount of foam. Tap the approaches in Part 1 to see what actually works.
(another room)
(levers 1–4)
(door / barrier)
(acoustic foam)
Contain the noise, not the heat
Key Takeaways
- Moving your rig into another room or closet can reduce noise by over 20 dB, often making it inaudible from your workspace.
- Proper ventilation is critical—use passive vents or exhaust fans to prevent overheating in sealed closet setups.
- Acoustic treatment should focus on the walls behind the mic and side walls, using panels, blankets, and sealing gaps for clarity.
- Low-frequency issues are common in small closets; bass traps or thicker panels help tame boomy sounds.
- Sealing cracks, vents, and outlets is an inexpensive way to minimize sound leaks and improve overall isolation.

Focusound 52 Pack Acoustic Foam Panels 1" x 12" x 12" Sound Proof Foam Panles Soundproofing Noise Cancelling Wedge Panels for Home Office Recoding Studio with 300PCS Double-Side Adhesive
Soundproofing - Acoustic foam panels triangular grooves structure for better noise absorption, helps to reduce and absorb unwanted...
As an affiliate, we earn on qualifying purchases.
As an affiliate, we earn on qualifying purchases.
Why Distance and Isolation Outperform Foam in Noise Control
Distance is the most effective way to silence your rig. Think of it as turning down the volume at the source. Moving your high-power AI rig into another room or a closet cuts noise by at least 20-30 dB—sometimes more—making it almost inaudible from your desk.
Foam panels and acoustic treatments only soften reflections inside a space—they don’t block sound from escaping. If you want silence, you must physically separate the source from your workspace. For example, a rig tucked into a closet with a door sealed tight can be as quiet as a whisper, even if it’s roaring inside.
This approach suits AI workstations perfectly. You don’t need to sit next to them. Instead, run a wired connection or strong Wi-Fi, and control the rig remotely. You can learn more about cloud server solutions to optimize remote control and data management. That way, noise is no longer a problem—your desk stays silent, while the rig roars in peace.
Understanding why this works is crucial: sound diminishes with distance due to the inverse square law, meaning doubling the distance from the source reduces perceived loudness by about 6 dB. The tradeoff is convenience versus noise reduction—placing the rig away from your primary workspace requires reliable remote control and good cable or network infrastructure. This method is especially valuable in shared living spaces or apartments where noise can be a significant issue.

ATS Acoustics Home Office Residential Acoustic Treatment Room Kit Sound Absorbing Acoustic Panel 8 Pack for 120-200 Sq Ft (Platinum)
8 Piece Kit contains 6 wall panels and 2 ceiling panels, each panel is sized 24" x 48"...
As an affiliate, we earn on qualifying purchases.
As an affiliate, we earn on qualifying purchases.
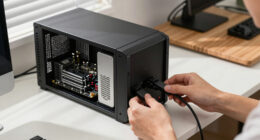
The "Rig in the Closet" setup — How to make it work without overheating
Placing a powerful, heat-generating rig inside a closet sounds perfect for noise reduction. But it comes with a big caveat: heat. Trapped heat can raise temperatures to 90°F or higher, which can throttle performance, cause thermal shutdowns, or damage sensitive components over time.
To keep your rig cool and quiet, effective ventilation isn’t optional — it’s essential. Passive vents alone often won’t suffice because they rely on natural convection, which may be slow or ineffective in small, sealed spaces. Installing a quiet exhaust fan actively pulls hot air out, maintaining a stable temperature. Ducted systems with thermostatic controls can automatically adjust airflow based on temperature, ensuring your rig stays cool without excessive noise from the fan itself.
Consider the tradeoffs: adding ventilation can introduce sound into your environment, but choosing low-noise fans and proper ducting minimizes this. Additionally, integrating temperature sensors and automatic fans helps prevent overheating without constant manual intervention. For example, a builder used a custom vented enclosure with a thermostatically controlled exhaust fan. The result was a significant reduction in noise and temperature spikes, maintaining optimal performance while keeping the setup quiet. Proper cooling strategies prolong your hardware’s lifespan and ensure consistent performance, making ventilation a critical aspect of closet rigs. For more on optimizing your workspace environment, see acoustic treatment and setup tips.

VEVOR Portable Vocal Booth, 6.56 ft Height, Portable Recording Studio with Travel Bag, Mobile Tablet Stand, Thickened Soundproofing, Sound Isolation Booth for Echo-Free Vocals, Podcasts, Voiceovers
Say Goodbye to Echoes: Built with durable Oxford cloth and acoustic padding, this recording booth for the home...
As an affiliate, we earn on qualifying purchases.
As an affiliate, we earn on qualifying purchases.
How to Treat Your Closet for the Best Sound Inside
Acoustic dampening inside your closet isn’t just about stuffing it with foam. It’s about targeting reflections and standing waves that cause boomy, boxy sounds. Start by treating the wall behind your microphone, then the side walls, ceiling, and even the floor.
Use a combination of materials: 2-inch thick foam panels for general absorption, bass traps for low-end control, and blankets or rugs on the floor for added damping. Seal gaps around the door with weatherstripping or acoustic sealant to prevent sound leaks. Why does this matter? Because small enclosed spaces tend to amplify certain frequencies due to reflections, creating a harsh or muddy sound. Proper treatment reduces these problematic reflections, resulting in clearer recordings and more accurate monitoring. The key is understanding that different frequencies require different treatment: bass traps target low frequencies that tend to build up in corners, while foam panels handle mid and high frequencies. This balanced approach ensures your recordings sound natural and professional, even in a tiny space.

Sound Addicted - Studio Monitor Isolation Pads for 5 Inch Monitors, Pair of Two High Density Acoustic Foam which Fits Most Speaker Stands | SMPad 5
SMPad 5 is made out of the highest quality acoustical foam (50kg/m^3 density).
As an affiliate, we earn on qualifying purchases.
As an affiliate, we earn on qualifying purchases.
Sealing the Leaks: The Hidden Weak Points in Your Closet
Sound leaks through cracks, vents, and gaps in the door frame. These tiny openings can let noise escape or intrude from outside. To improve isolation, use weatherstripping around the door, seal vents with acoustic foam or blankets, and cover outlets with gaskets or putty pads.
But why is this important? Because even small gaps can significantly undermine your noise reduction efforts. Gaps around vents or outlets act as sound bridges, allowing noise to seep out or outside noise to intrude, reducing the effectiveness of your setup. Sealing these weak points enhances your overall isolation, making your recordings more private and your environment more peaceful. For example, a musician sealed the door with weatherstripping and added a thick blanket over the door frame, which resulted in a notable noise reduction. Remember, the more airtight your space, the better your chances of controlling unwanted sound — especially when working with high-gain microphones or sensitive recordings. Investing time in identifying and sealing these leaks yields noticeable improvements in sound isolation.
Taming the Low Frequencies in Small Closets
Small closets often develop bass issues—standing waves and boomy sounds—because of parallel walls and confined space. For tips on treating these issues, visit this guide on low-frequency treatment. These low frequencies tend to resonate and create uneven sound, which can muddy recordings and make mixing difficult. To combat this, add bass traps or thicker panels at corners where low-end build-up occurs. Proper placement of bass traps can absorb these problematic frequencies before they bounce around, creating a more balanced sound profile. Learn more about acoustic dampening techniques.
For example, a creator used DIY bass traps made from rockwool tucked into the corners of a closet, cutting bass resonance by nearly 50%. This resulted in clearer vocals and more accurate monitoring. The key is understanding that low frequencies are less directional and require specific treatment to prevent them from dominating your mix. If you notice your recordings sound muffled or boomy, it’s a sign that low-end control is needed. Addressing bass issues in small spaces is essential because it directly impacts clarity, intelligibility, and the overall quality of your recordings. Without proper low-frequency treatment, even the best microphones and converters can produce muddy, indistinct sound.
DIY Materials That Make a Big Difference Without Breaking the Bank
You don’t need fancy gear to improve your closet’s sound. Common household items work surprisingly well. Think: moving blankets, thick rugs, weatherstripping, and even cardboard panels covered in fabric.
For example, a hobbyist taped moving blankets over the closet walls using Command strips, creating a quick and reversible booth. It cut echo and background noise significantly, without any permanent modifications. Similarly, placing a thick rug on the floor absorbs sound reflections, while sealing gaps around doors and outlets prevents leaks. These solutions are inexpensive, easy to implement, and highly effective for small spaces. They also allow for flexibility: you can remove or adjust them as needed without damaging your walls or furniture. The goal is to create a more controlled environment that minimizes unwanted reflections and noise without requiring a full professional studio build.
Why True Soundproofing Is Hard in a Closet and What You Can Still Achieve
Real soundproofing—completely blocking sound—is tough in a closet. Even thick drywall, added mass, or damping materials won’t fully stop sound leaks because sound travels through air, gaps, and structural vibrations. The goal is to *reduce* leakage as much as possible, but it’s unrealistic to expect complete isolation in a typical closet setup.
For instance, adding a second drywall layer with damping compound can improve isolation by 10-15 dB, but that still leaves some sound escaping, especially at low frequencies which are harder to block. Materials like mass-loaded vinyl or specialized damping mats can help, but they add weight, cost, and complexity. The key is understanding the tradeoffs: achieving near-perfect soundproofing requires extensive modifications, often impractical for a simple closet. Instead, focus on a combination of sealing leaks, strategic placement of treatment, and distance—these collectively provide a significant reduction in noise. Think of your closet as a leaky bucket: you can slow the leak, but not stop it entirely. Setting realistic expectations helps you optimize your setup without unnecessary expense or effort.
Frequently Asked Questions
Can you really turn a closet into a vocal booth?
Yes, with proper acoustic treatment, sealing, and ventilation, a closet can become a surprisingly effective vocal booth. It’s a popular DIY solution for home studios, especially for small spaces.What is the difference between acoustic treatment and soundproofing?
Acoustic treatment reduces reflections and echo inside a space, making sound clearer. Soundproofing blocks sound from escaping or entering. They serve different purposes but work best together.Where should I place acoustic panels in a closet?
Start by treating the wall behind the microphone, then add panels to the side walls and ceiling. Seal gaps around the door and vents to prevent sound leaks.Do I need bass traps in a small closet studio?
If you notice bass buildup or boominess, adding bass traps at corners helps control low frequencies and improves overall sound clarity.How do I stop sound from leaking through the closet door?
Use weatherstripping around the door frame, seal gaps with acoustic sealant, and consider adding a blanket or acoustic panel over the door for extra isolation.Conclusion
Turning a closet into a quiet, effective workspace isn’t about magic—it’s about smart placement, good sealing, and thoughtful treatment. When you move your rig out of reach or into a well-ventilated closet, you cut noise at the source, making your workspace peaceful without sacrificing performance.
Remember, the goal isn’t perfect silence but a practical balance: enough noise reduction to focus on your work, with proper airflow to keep your rig healthy. Your best soundproofing tool? Good placement and sealing—because sometimes, the simplest fixes are the most powerful.